

Training Zones
Zone Training for Hiking, Fastpacking, and Long Climbs
Learn how to use heart-rate zones for hiking, fastpacking, and sustained climbs while accounting for steep grades, pack weight, altitude, heat, and the hidden muscular cost of descents.
Introduction
Zone training works for hiking, fastpacking, and long climbs when you use heart rate to control aerobic effort—not to chase a fixed pace. On steep terrain, speed can fall dramatically while internal effort rises. A heavier pack can increase the cost of the same route. Heat and altitude can change the heart-rate response. The descent may look easy on a zone chart while creating the most muscle damage of the day. The same principle explains why trail pace breaks even when heart-rate zones remain useful.
The practical solution is to pair heart-rate zones with four trail-specific details: elevation gain, pack weight, terrain, and perceived effort. Use zones to pace sustained climbs and organize the aerobic purpose of a session. Use the other details to capture stresses heart rate cannot see.
For most long mountain days, the default is conservative: spend much of the climb at an intensity you can sustain, allow brief rises when the terrain forces them, and avoid turning the first ascent into a threshold test. In one study of amateur runners completing a 65-kilometer mountain ultramarathon, most race time occurred below the first ventilatory threshold (Fornasiero and colleagues). That does not prescribe a universal percentage for hikers, but it supports the basic logic of protecting low intensity during very long efforts.
This guide explains how to set useful zones, apply them on changing grades, train for fastpacking with a pack, account for descents, and review mountain sessions in Zone Training Log.
Why Trail Pace Is a Poor Intensity Target
Road pace assumes a fairly stable relationship between speed and effort. Mountain terrain breaks that relationship. A kilometer on smooth flats, a kilometer at 15% grade, and a kilometer over loose rock are three different tasks.
The metabolic cost of walking and running changes sharply with slope. Laboratory research across extreme uphill and downhill grades found that energy cost rises on positive slopes and follows a different curve on descents (Minetti and colleagues). Natural terrain, footwear, surface irregularity, and equipment add more variation. A field comparison found that outdoor hiking with hiking footwear did not match level treadmill walking at the same speed (Fattorini and colleagues).
That is why “12 minutes per kilometer” is not an intensity prescription for a climb. It is merely the speed produced by a specific athlete on a specific grade with a specific surface and load.
Use these signals in order:
- Purpose: Is the session easy endurance, a steady climb, hard uphill intervals, or long-day specificity?
- Heart rate: Is internal cardiovascular load staying in the intended range?
- Perceived effort: Does breathing and whole-body effort agree with the watch?
- Trail context: What do grade, footing, pack weight, temperature, and altitude explain?
- Pace or vertical speed: How much output did that combination produce?
Pace and vertical speed become valuable when you compare similar climbs. They are less useful as universal targets across unrelated routes.
Set Zones That Reflect Your Physiology
Heart-rate zones are only as useful as their anchors. Generic percentages of maximum heart rate can place different people on opposite sides of important metabolic thresholds. A review of exercise-intensity prescription explains why threshold-based methods, heart-rate reserve, and other individualized approaches may be preferable to a single percentage of maximum heart rate (Mann, Lamberts, and Lambert).
If you have lab-tested aerobic and anaerobic thresholds, use them. If not, use a recent, appropriate field assessment and confirm the result against breathing and perceived effort. Avoid changing zones because of one unusually hot climb or one bad sensor trace.
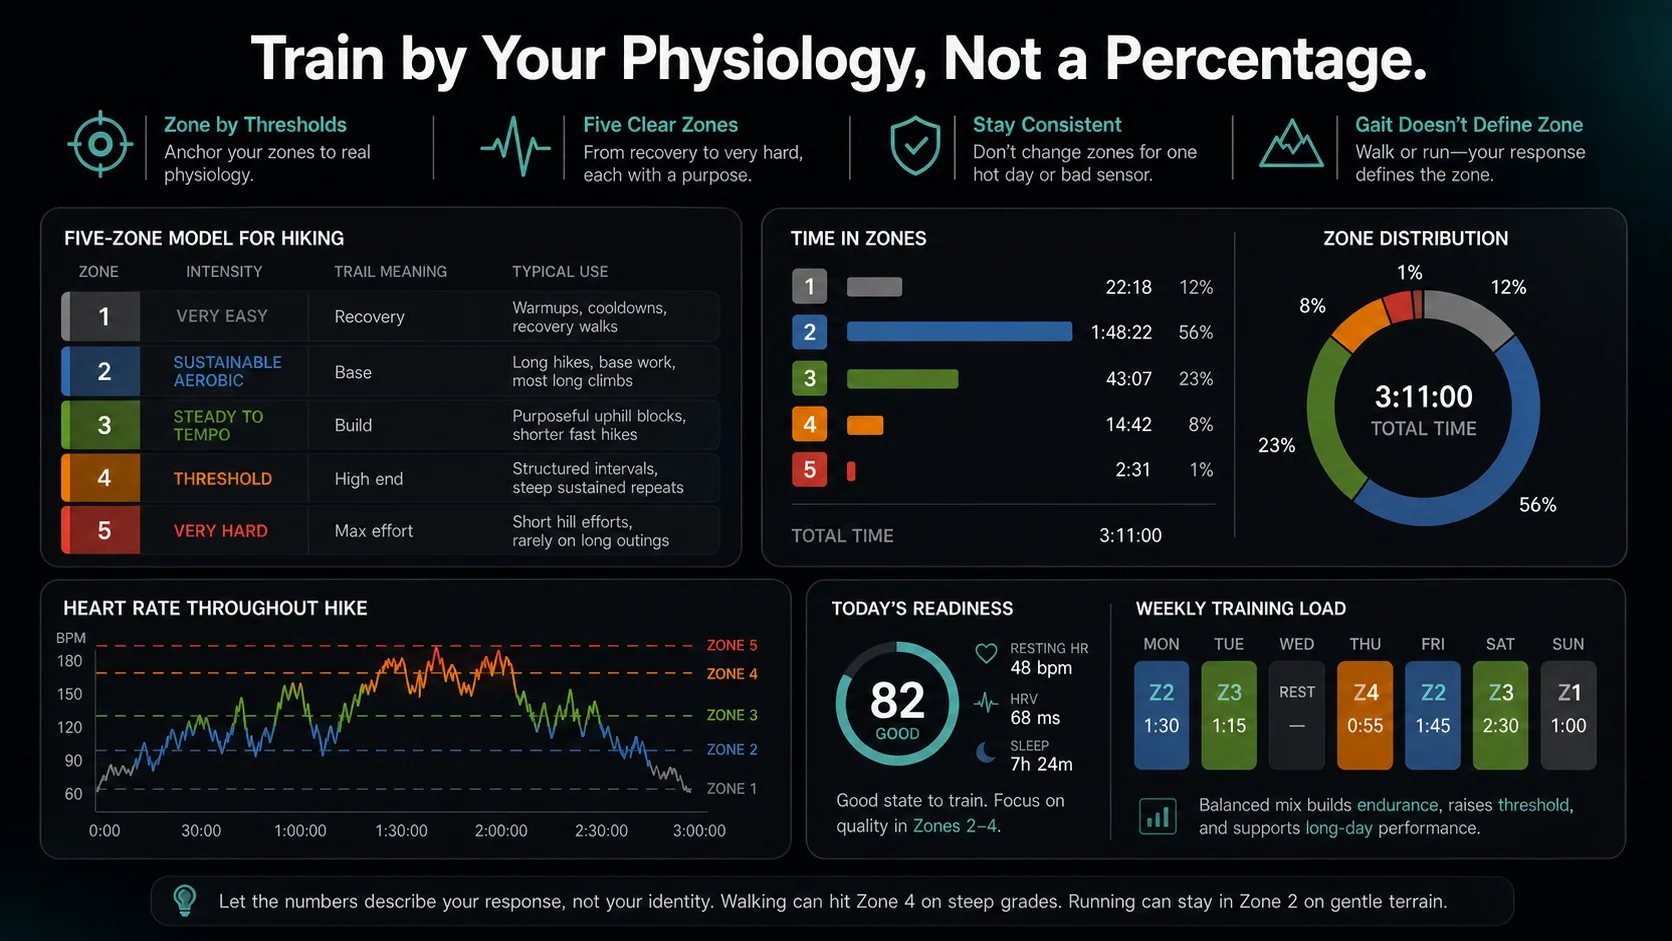
A five-zone model can be practical for hiking:
| Zone | Trail meaning | Typical use |
|---|---|---|
| Zone 1 | Very easy | Recovery walks, warmups, cooldowns |
| Zone 2 | Sustainable aerobic | Long hikes, base work, most long climbs |
| Zone 3 | Steady to tempo | Purposeful uphill blocks, shorter fast hikes |
| Zone 4 | Threshold | Structured uphill intervals, steep sustained repeats |
| Zone 5 | Very hard | Short hill efforts, rarely useful on long outings |
The numbers should describe your response, not your identity as a runner, hiker, or fastpacker. Walking can reach Zone 4 on a steep grade. Running can stay in Zone 2 on gentle terrain. The gait does not define the zone.
Use Zones to Control Long Climbs
On a long climb, choose the target before the slope chooses it for you. For an aerobic day, settle into an effort that keeps breathing controlled and allows short phrases or conversation. Let speed change with the grade. If heart rate rises above the target, shorten the stride, reduce pace, switch from running to hiking, or pause briefly when safety allows.
Do not treat walking as failure. The energetically best walk–run transition changes with incline, and heart rate alone does not accurately predict the optimal transition for every individual (Brill and Kram). Experienced mountain athletes often hike steep grades because it is the right locomotion strategy, not because they stopped trying.
For steady Zone 2 climbing:
- Start below the ceiling during the first 10 to 20 minutes.
- Use short steps and a cadence you can sustain.
- Accept brief spikes around obstacles, then settle promptly.
- Compare heart rate with breathing and leg effort.
- Record the duration of the climb, not only the outing average.
For uphill intervals, choose a repeatable grade and a safe descent. A session might use four to six controlled repeats in Zone 4 with easy walking recovery. Heart rate lags at the start, so do not sprint to force the number upward. Use effort and repeat consistency, then review heart rate afterward.
The longest climb of the week does not always need to be the hardest. Long climbs already combine duration, elevation, and local muscular fatigue. Adding threshold intensity changes the recovery cost.
Use Vertical Speed as an Output, Not a Zone
Vertical speed—often expressed as meters or feet gained per hour—is a useful performance measure on sustained climbs. It tells you how much elevation you converted from a given amount of time and effort. It does not replace heart rate because it is still shaped by grade, switchbacks, footing, pack weight, and the accuracy of elevation data.
Compare vertical speed only when the context is reasonably similar. A smooth 10% fire road and a rocky 25% trail should not share the same benchmark. Neither should a light training vest and an overnight pack.
A useful comparison might read:
| Climb | Heart-rate response | Vertical speed | Interpretation |
|---|---|---|---|
| Same route, same Zone 2 HR | Higher than last month | Higher | Possible aerobic or technical improvement |
| Same route, same vertical speed | Lower HR and RPE | Stable | Possibly improved efficiency |
| Same route, higher HR and RPE | Lower | Lower | Check fatigue, heat, fueling, or illness |
| Different route or pack | Any change | Any change | Context too different for a clean conclusion |
Do not overinterpret one result. GPS elevation can be noisy, weather matters, and a crowded or technical trail can change movement. Trends across several comparable climbs are more useful than a personal record set under different conditions.
Fastpacking Adds Load That Heart Rate Cannot Fully Describe
Fastpacking combines efficient hiking or running with enough equipment for a longer route or overnight travel. The pack is not a minor note. Added mass changes the mechanical and metabolic demands of locomotion.
In a controlled walking study, mechanical work and metabolic cost increased approximately linearly as backpack load increased, with the ankle and knee contributing much of the additional positive work (Huang and Kuo). Research on sloped load carriage likewise treats total mass—body plus load—as part of the cost of vertical movement (Santee and colleagues).
Heart rate may reflect some of that extra demand, especially uphill, but it will not tell you where the mechanical stress went. Log pack weight and how it changed posture, foot comfort, shoulders, balance, and descending control.
Build pack specificity gradually:
| Training phase | Pack strategy | Main goal |
|---|---|---|
| General base | Light or no pack | Aerobic consistency and movement quality |
| Early specific | Short outings with planned load | Adapt posture, feet, and shoulders |
| Specific block | Longer climbs with realistic load | Practice pacing, equipment, and fueling |
| Taper or recovery | Reduced load | Preserve freshness while keeping familiarity |
Avoid copying an arbitrary pack-to-body-weight rule from a small study or military population. The appropriate load depends on duration, terrain, equipment, training history, and the actual demands of the trip. The useful progression is the minimum load required by the objective, introduced early enough to learn from it.
Trekking poles can redistribute some work, but they do not erase the cost of the pack. In steep uphill walking, poles produced small energetic savings at some grades and lower perceived effort in one study of mountain runners (Giovanelli and colleagues). A later study found modest reductions in foot force without a meaningful change in cardiorespiratory cost (Giovanelli and colleagues). Practice with poles if you plan to use them; technique matters.
Descents Are the Hidden Load in a Zone Chart
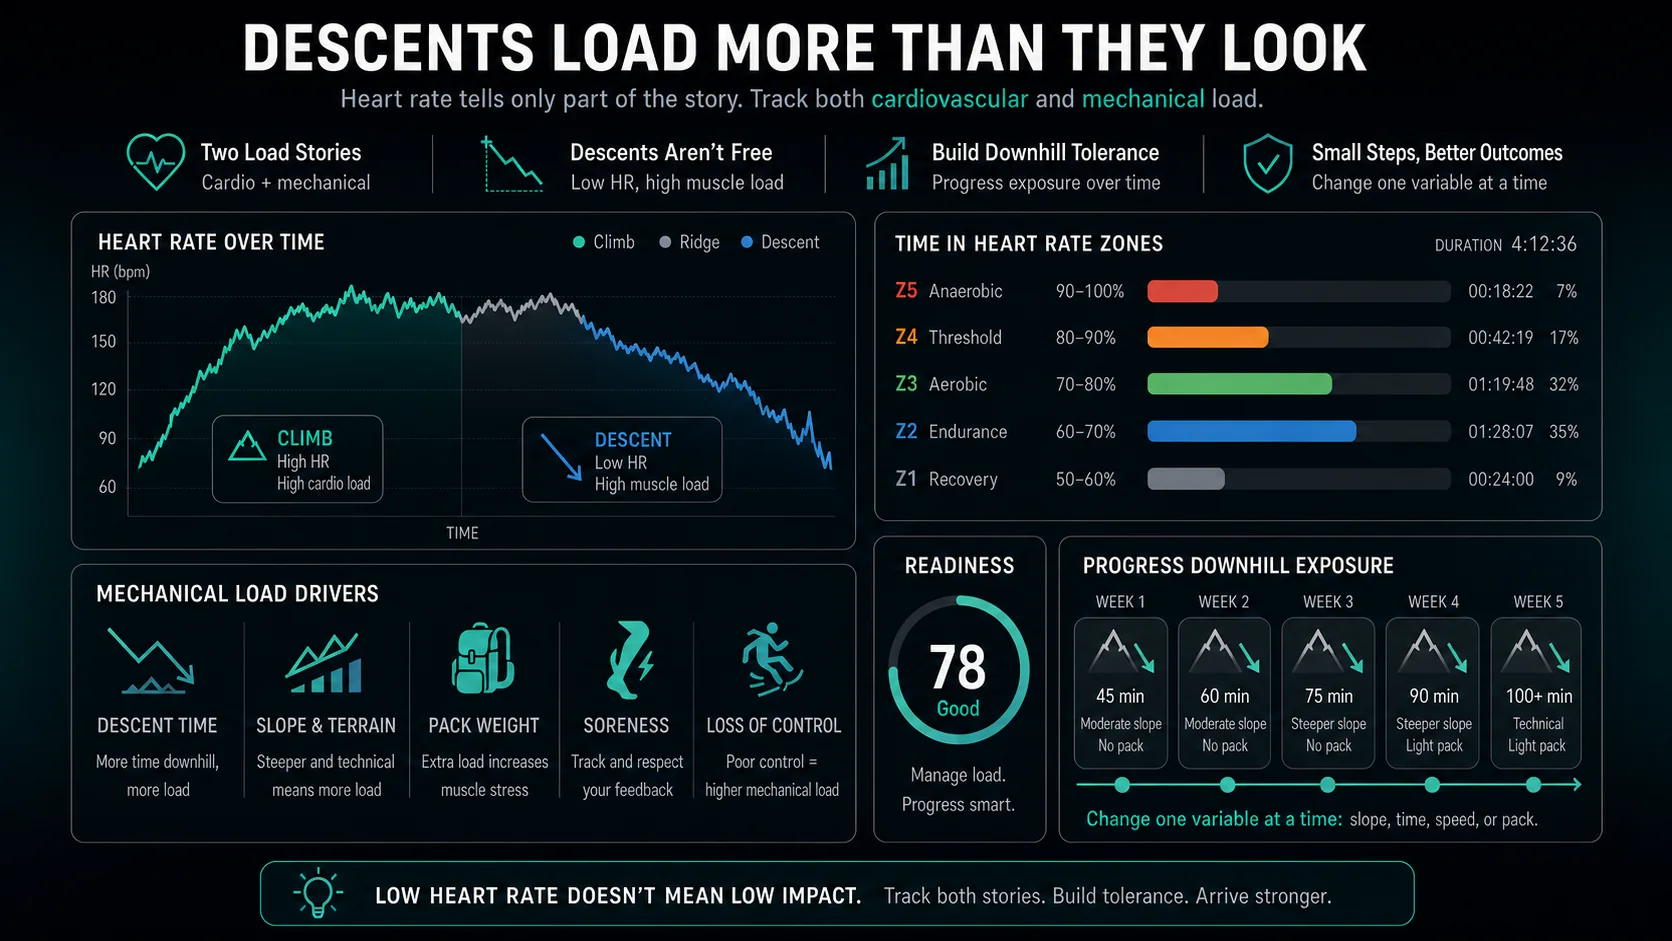
A long descent can show low or moderate heart rate while heavily loading the quadriceps. Downhill movement relies on repeated eccentric actions, meaning muscles produce force while lengthening to control the body. Cardiovascular cost can be lower than climbing, but muscular and coordination demands can be high.
A review of downhill running found that slope, duration, and speed influence exercise-induced muscle damage and subsequent reductions in function (Bontemps and colleagues). Hiking is not identical to downhill running, but the basic warning applies: low time in high heart-rate zones does not make the descent free.
This is why a mountain session needs two load stories:
- Cardiovascular load: time in heart-rate zones, especially on sustained climbs.
- Mechanical load: descent time, elevation loss, terrain, pack weight, soreness, and loss of control.
Progress downhill exposure rather than saving it for the goal event. A small controlled study found that a brief, non-damaging downhill walking bout reduced markers of damage after a later, longer downhill walk—a version of the repeated-bout effect (Maeo and colleagues). A 2023 systematic review and meta-analysis found that preconditioning can reduce some signs of exercise-induced muscle damage, while also emphasizing differences among protocols and outcomes (Boyd and colleagues).
The practical lesson is modest: introduce descents progressively. Start with manageable slopes and duration, recover, then add technicality, speed, or pack load one variable at a time.
Adjust for Heat, Duration, and Altitude
Heart rate is a biological signal, not a fixed output gauge. During prolonged exercise, it can rise even when speed or power stays stable. Cardiovascular drift is associated with rising heart rate and falling stroke volume, and heat stress can amplify it (Wingo, Ganio, and Cureton). On a long summer climb, slowing to stay in the same zone may be appropriate rather than evidence that fitness disappeared.
Use context when heart rate drifts:
- Compare early and late sections of a similar grade.
- Note heat, sun exposure, hydration, and fueling.
- Watch whether perceived effort rises with heart rate.
- Slow down before the planned aerobic day becomes a threshold day.
- Treat sudden implausible spikes or drops as possible sensor error.
Altitude adds another layer. Maximal heart rate tends to decline as hypoxia increases, although individual and study-level variation is substantial (Mourot). Sea-level zone boundaries can therefore become less reliable at meaningful altitude. A Himalayan trekking study also found that fitter participants reported lower effort during ascent, but greater fitness did not protect them from acute mountain sickness (Rossetti and colleagues).
Use heart rate and RPE conservatively at altitude, but do not use either to rule out altitude illness. Headache, nausea, dizziness, unusual fatigue, confusion, loss of coordination, or worsening symptoms require an altitude-safety response, not a zone adjustment. Follow qualified medical and expedition guidance.
Train for Climbs When You Live on Flat Ground
Mountain specificity is easiest to build on mountains, but flat-ground athletes still have options. Use an inclined treadmill, stairs, stadium steps, parking ramps, bridges, or repeated short hills to accumulate continuous climbing time. Strength training can prepare the legs and trunk for load, while planned downhill exposure during occasional trail trips develops a quality that uphill treadmill work cannot replace.
Match the substitute to the goal:
- Use a sustained treadmill incline for continuous Zone 2 climbing.
- Use stairs or short hills for harder uphill repeats.
- Carry the planned pack only after movement is comfortable without it.
- Step down under control when introducing eccentric work; do not manufacture huge descent volume in one session.
- Practice poles on a surface where they are allowed and safe.
An outdoor cardio-trekking study successfully combined an uphill trail, heart rate, and perceived exertion in a submaximal fitness test, demonstrating that these signals can work together outside the laboratory (Eisenberger and colleagues). For regular training, keep the purpose simpler: reproduce the duration and intensity of climbing while accepting that a machine cannot reproduce loose terrain, route finding, weather, or descending skill.
When you finally reach mountain terrain, treat the first outings as technique and specificity sessions rather than fitness examinations. Let tendons, feet, balance, and descending control catch up with the aerobic engine.
Build a Week Around the Goal Outing
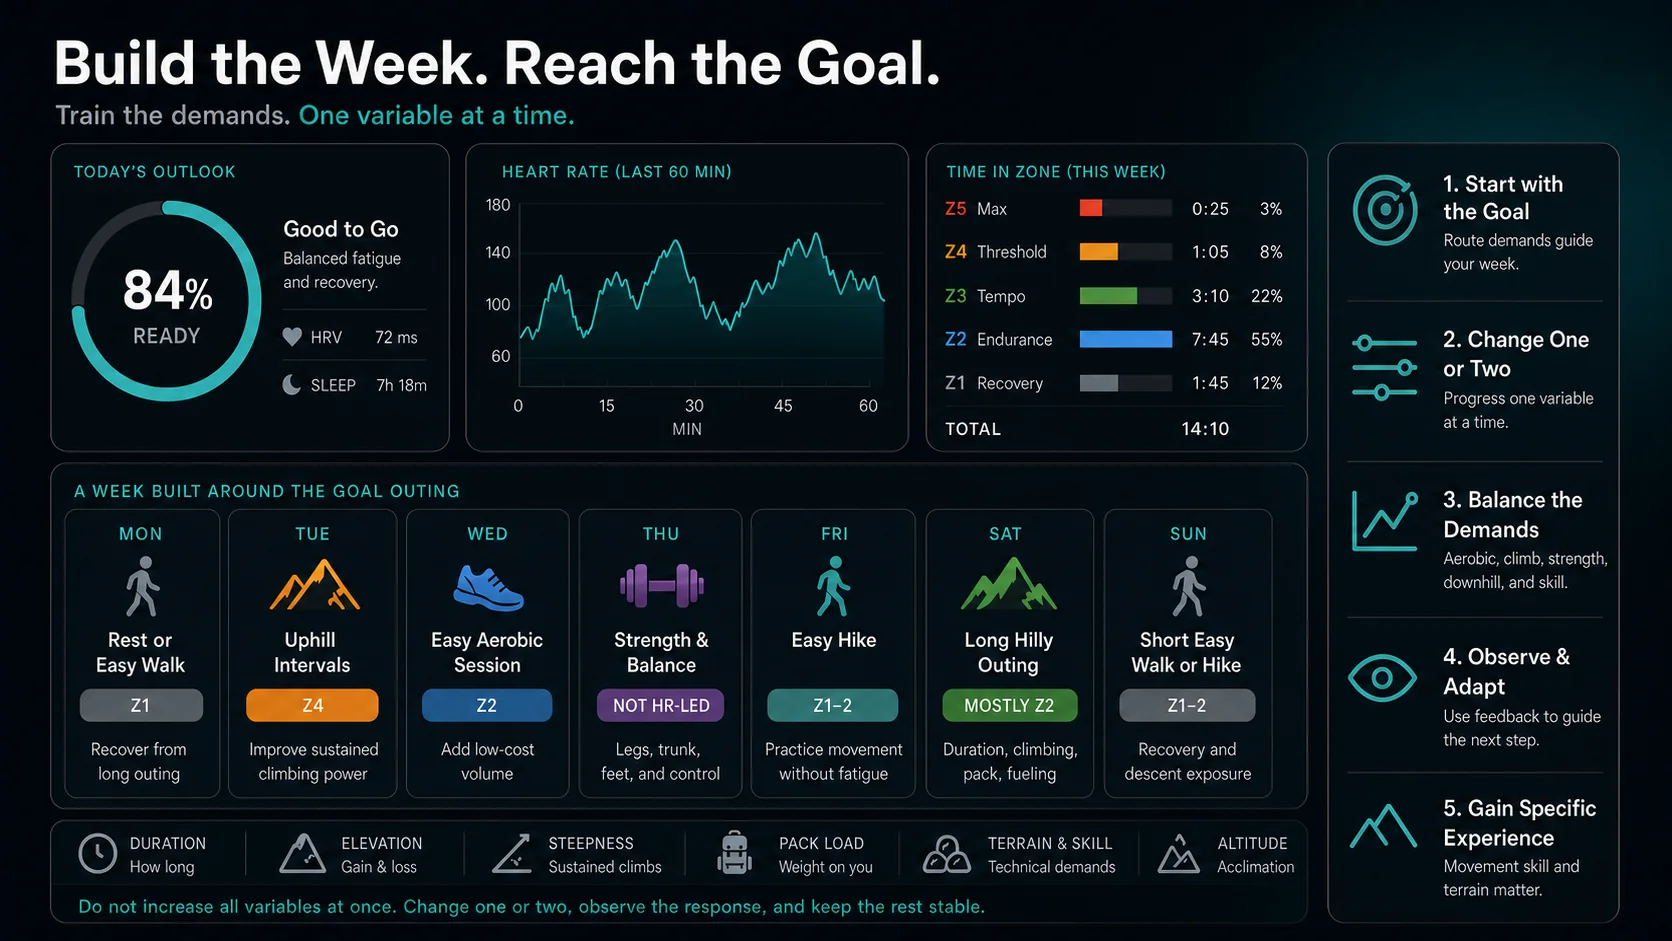
Start with the demands of the route: expected duration, elevation gain and loss, steepest sustained climb, altitude, technical terrain, and pack load. Then build the week so aerobic fitness, climbing ability, strength, and downhill tolerance progress together.
An illustrative week might look like this:
| Day | Session | Zone purpose | Trail-specific purpose |
|---|---|---|---|
| Monday | Rest or easy walk | Zone 1 | Recover from long outing |
| Tuesday | Uphill intervals | Zone 4 blocks | Improve sustained climbing power |
| Wednesday | Easy aerobic session | Zone 2 | Add low-cost volume |
| Thursday | Strength and balance | Not HR-led | Legs, trunk, feet, and control |
| Friday | Easy hike | Zone 1–2 | Practice movement without fatigue |
| Saturday | Long hilly outing | Mostly Zone 2 | Duration, climbing, pack, fueling |
| Sunday | Short easy walk or hike | Zone 1–2 | Recovery and gentle descent exposure |
This is a logic pattern, not a prescription. A beginner may need only one demanding session. An experienced fastpacker may use back-to-back days during a specific block. Someone preparing for a steep day hike may need more vertical gain and less pack specificity.
For the long hilly outing, Carbs, Glycogen, and Long Workouts explains how duration, climbing, and terrain change fueling needs.
Do not increase duration, elevation, descent, technicality, and pack weight at the same time. Change one or two variables, observe the response, and keep the rest stable enough to interpret. Trail performance is multifactorial; a systematic review found that conventional endurance variables explain only part of real-world trail-running performance (de Waal and colleagues). Specific experience and movement skill matter.
What to Record in Zone Training Log
The log should let you understand both the aerobic session and the mountain context. After each hike or fastpack, record:
- Duration and distance
- Elevation gain and loss
- Time in heart-rate zones
- Average and maximum heart rate
- Session RPE
- Pack weight
- Surface and technical difficulty
- Weather, heat, and altitude
- Pole use and footwear when relevant
- Notes on feet, shoulders, quadriceps, fueling, and descent control
Zone Training Log can organize the workout, zone distribution, elevation, effort, tags, and notes in one timeline when the underlying data arrives through Apple Health or Health Connect. Use a consistent tag such as long-climb, loaded-pack, technical-descent, or altitude so similar sessions can be found later.
Review the climb separately from the outing average. A four-hour activity with two hours of easy descending may show a moderate average heart rate even if the ascent was too hard. Compare time in zone during the sustained uphill section, then read the descent and pack notes before deciding how stressful the day was.
At the end of the week, ask:
- Did most easy climbing stay controlled?
- How much purposeful moderate or hard uphill work did I complete?
- Did pack or descent stress affect the next two days?
- Am I progressing one trail-specific demand at a time?
- What is the smallest adjustment needed next week?
The goal is not a perfect score. It is a training history that explains why the same zone distribution felt manageable one week and costly the next.
Common Zone-Training Mistakes on Trails
The first mistake is chasing pace uphill. Pace is an outcome of slope, surface, load, weather, and fitness. Control effort first.
The second is forcing a run when hiking is more economical or sustainable. Gait is a tool. Switch deliberately before form and breathing deteriorate.
The third is judging the whole outing by average heart rate. Segment the climb, descent, and flats when possible.
The fourth is ignoring low-heart-rate muscular load. Long descents, technical terrain, and a heavy pack can create fatigue that a zone chart barely registers.
The fifth is using sea-level zones rigidly at altitude. Combine heart rate with perceived effort and conservative pacing, and separate training decisions from altitude-illness safety.
The sixth is making every long hike moderately hard. Long duration, vertical gain, and pack load already create a substantial stimulus. Protect easy weeks and plan hard climbing rather than drifting into it.
Conclusion
Zone training for hiking, fastpacking, and long climbs works best as part of a trail-specific system. Use heart rate to control aerobic intensity, especially on sustained climbs. Let pace change with grade. Pair zone data with perceived effort, elevation, pack weight, terrain, heat, altitude, and descent notes.
Keep most long outings sustainable, use harder uphill work deliberately, practice the gait and equipment you will use, and progress downhill exposure instead of ignoring it. In the log, separate cardiovascular load from mechanical load. That is how heart-rate zones become useful in the mountains without pretending they explain the whole mountain.

Our editorial approach & AI disclosure
We use AI to help research, organize, and draft some articles. Every article is reviewed by a human editor and aims to reflect current evidence-based training practices and scientific literature.
Read our editorial policy