

Heart Rate Zones
Heart Rate Zone Training for Cyclists
Heart rate zone training helps cyclists turn rides into purposeful recovery, endurance, tempo, threshold, and VO2 max work. Learn how to set zones, use the calculator, pair heart rate with power, and build better cycling weeks.

Introduction
Heart rate zone training for cyclists means using heart rate ranges to give each ride a clear purpose. Zone 1 supports recovery. Zone 2 builds aerobic endurance. Zone 3 is steady tempo. Zone 4 targets threshold-style work. Zone 5 supports short, very hard intervals. The zones do not make the training plan for you, but they help you keep easy rides easy, place hard work deliberately, and review whether the week matched the plan.
For cyclists, heart rate is especially useful because it shows internal load. Power tells you how much work you are doing at the pedals. Speed tells you what happened on the road or trail. Heart rate tells you how your body responded. A 180-watt endurance ride can be relaxed on a cool, rested day and stressful on a hot, under-fueled day. Heart rate helps you see that difference.
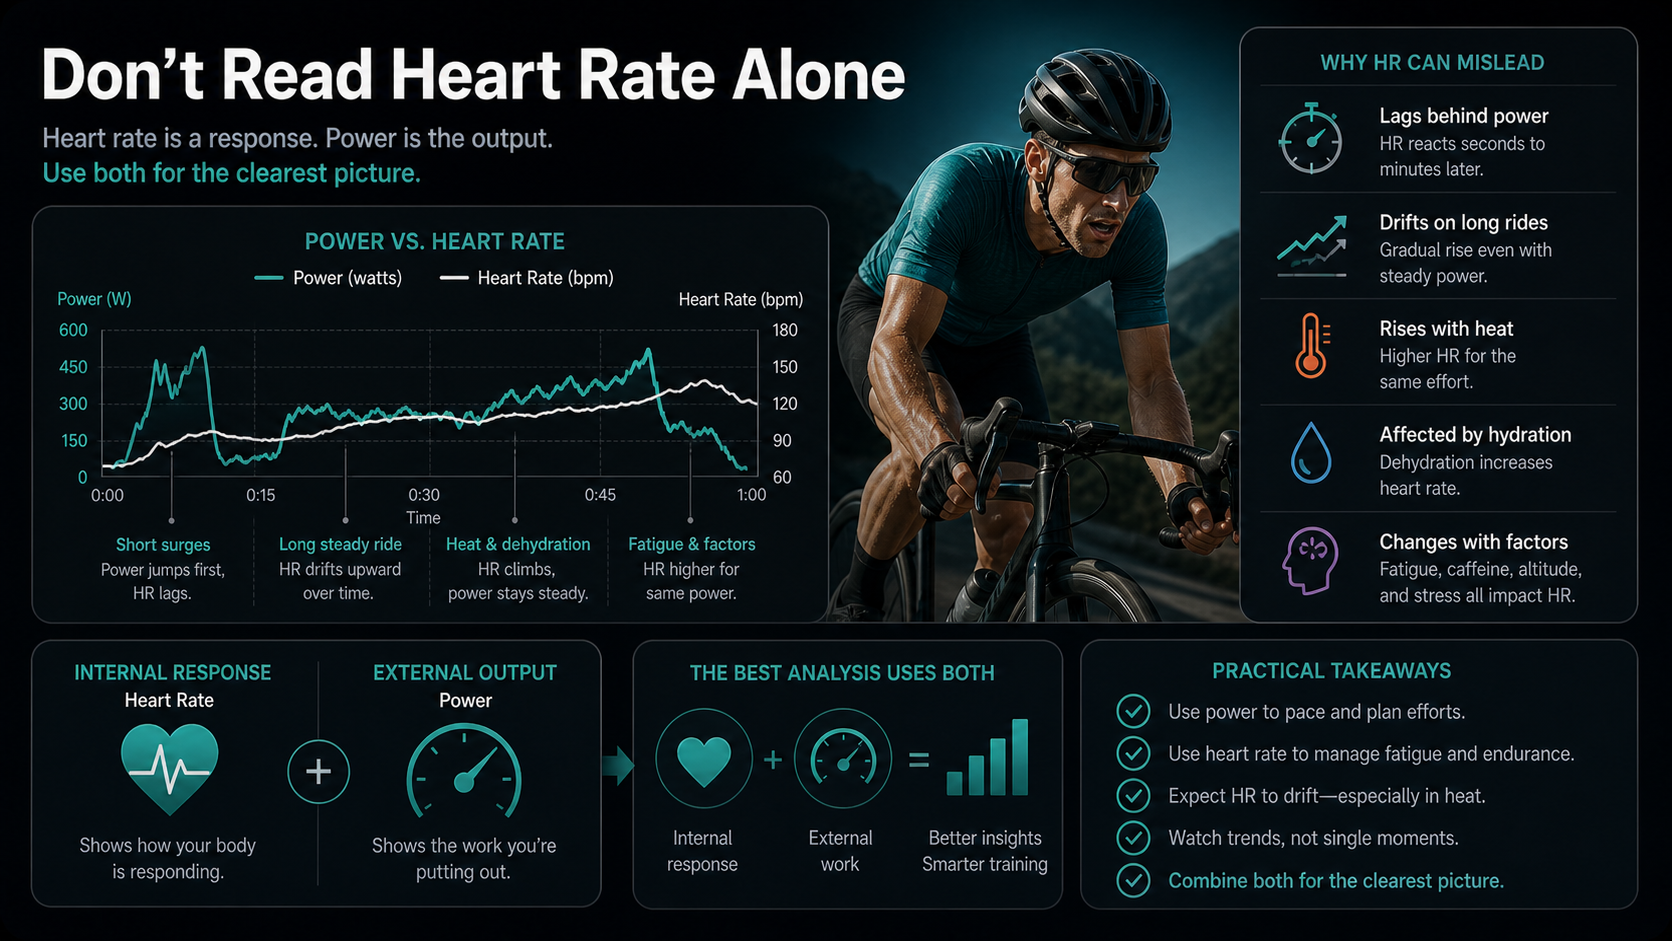
The limitation is that heart rate is not direct output. It responds slowly to short surges, drifts during long rides, rises with heat and dehydration, and changes with fatigue, caffeine, altitude, illness, and stress. Achten and Jeukendrup's review describes heart rate monitoring as useful for exercise prescription and training control, but also emphasizes that interpretation depends on conditions and individual physiology (Sports Medicine).
That is the right mindset for cycling: use heart rate as a strong training signal, not as a perfect command system.
This guide explains how cycling heart rate zones work, how to calculate them, why cyclists should not read heart rate alone, how zones compare with power, how to build a weekly training structure, and how to use Zone Training Log to turn ride data into decisions.
What Heart Rate Zones Mean On The Bike
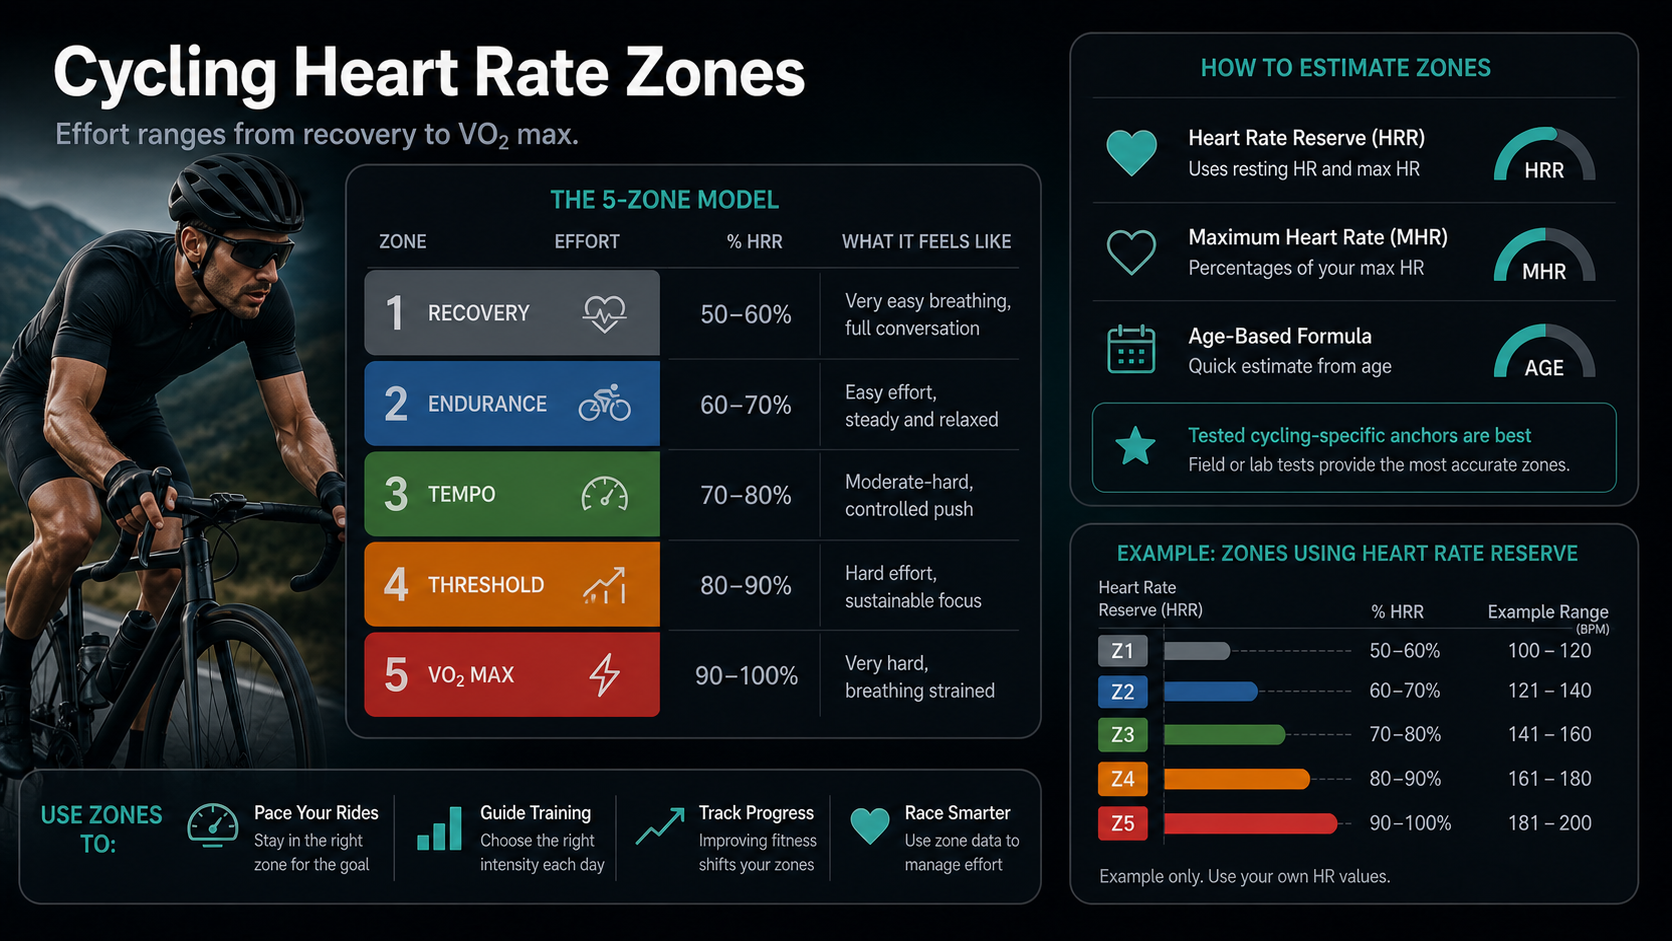
Heart rate zones divide effort into ranges. The labels vary by coach, device, and training system, but a practical five-zone model usually works like this:
| Zone | Cycling purpose | What it feels like |
|---|---|---|
| Zone 1 | Recovery and easy spinning | Very easy, relaxed breathing |
| Zone 2 | Endurance and aerobic base | Comfortable, sustainable, conversational |
| Zone 3 | Tempo or steady work | Controlled, purposeful, harder to talk |
| Zone 4 | Threshold-style work | Hard, focused, sustainable for limited blocks |
| Zone 5 | VO2 max and very hard intervals | Very hard, breathing strained, short duration |
The exact beats-per-minute ranges depend on how the zones are calculated. A simple system may use percentages of maximum heart rate. A more individualized system may use heart-rate reserve, which accounts for resting heart rate. A threshold-based system may anchor zones to cycling lactate threshold heart rate or a field-test estimate. Lab testing can provide more detail, but most cyclists start with a practical estimate and refine it over time.
The most important rule is to use cycling-specific anchors when you can. Do not assume your running zones transfer perfectly to cycling. Heart rate responses can differ by sport because posture, muscle recruitment, cadence, cooling, and local muscular fatigue differ. A runner who can reach 190 bpm in a hard run may not see the same maximum on the bike. A cyclist with a strong cycling background may have very stable bike-specific responses that differ from other sports.
Zones are tools for decisions. They are not moral labels. Zone 2 is not always better than Zone 3. Zone 5 is not always more productive than Zone 1. The right zone is the one that matches the ride's purpose.
Calculate Your Cycling Heart Rate Zones
If you do not already have tested cycling zones, start with a simple estimate and then sanity-check it against real rides. The embedded calculator below supports heart-rate reserve, maximum heart rate, and age-based estimates. Heart-rate reserve is usually the better starting point when you know both your maximum heart rate and resting heart rate. Max-heart-rate zones are useful when HRmax is the only reliable value you have. Age-based zones are only a rough fallback.
Use the calculator as a starting point, then compare the ranges with how rides actually feel. You can also open the standalone Heart Rate Zone Calculator when you want to calculate or revisit zones outside this article.
For cyclists, the best input is a tested or strongly observed cycling HRmax. If you use a running HRmax or a general age estimate, the zones may be too high or too low for bike training. If you know your cycling lactate threshold heart rate from a field test, coach assessment, or lab test, you may prefer threshold-based zones in your training plan. The calculator here is intentionally broad: it gives you usable five-zone ranges from common heart-rate inputs, not a replacement for a coach or lab protocol.
Age estimates deserve special caution. Tanaka, Monahan, and Seals proposed a revised age-predicted maximum heart-rate equation, but age formulas are population estimates, not precise individual tests (Journal of the American College of Cardiology01054-8)). Two cyclists of the same age can have very different true maximum heart rates. If an age-based zone chart says your easy ride is Zone 4 but you can talk comfortably and ride for hours, the estimate is probably wrong.
How To Choose The Right Zone Method
Use heart-rate reserve when you know your cycling maximum heart rate and a reliable resting heart rate. Heart-rate reserve subtracts resting heart rate from maximum heart rate, then applies percentages to the usable range. This often gives more individualized ranges than percentage of maximum heart rate alone.
Use max-heart-rate zones when you have a tested or observed cycling HRmax but do not trust your resting heart rate. This method is simple and easy to compare across devices, but it ignores the difference between a cyclist with a resting heart rate of 42 and a cyclist with a resting heart rate of 68.
Use age-based estimates only when you need a first draft. They are better than guessing, but they are not enough for serious training decisions. Age estimates can be especially misleading for athletes, older trained cyclists, and anyone whose true HRmax sits far from the population average.
Use threshold-based zones when you have a cycling threshold anchor and want the zones to match performance intensity more closely. Lactate and ventilatory thresholds are central concepts in endurance training, but the methods used to identify them vary. Faude, Kindermann, and Meyer reviewed lactate-threshold concepts and highlighted that different threshold definitions can produce different values (Sports Medicine). That is why a threshold number should be tied to the method that produced it.
In practice, many cyclists combine methods. They may start with HR reserve zones, compare those with perceived effort and power, then adjust boundaries after a field test or several weeks of training logs.
The Five Zones For Cyclists
Zone 1 is recovery. On the bike, Zone 1 should feel almost too easy. It is useful for warmups, cooldowns, recovery spins, easy commuting, and days when the goal is to move without adding much stress. If your recovery ride keeps drifting into Zone 3 because you are chasing speed, it is no longer a recovery ride.
Zone 2 is endurance. This is the bread-and-butter range for many cyclists. Zone 2 rides build aerobic volume, support fat oxidation, improve durability, and create the base that lets harder training work. A Zone 2 ride should feel controlled enough that you can keep steady pressure on the pedals without needing constant focus. On rolling terrain, that may mean letting speed drop on climbs instead of fighting to hold pace.
Zone 3 is tempo. It is steady, controlled, and productive when planned. It can be useful for sportive preparation, long climbs, steady group rides, race-specific endurance, and riders who need to tolerate sustained pressure. The risk is that Zone 3 can become the default for every ride. It feels satisfying, but it costs more recovery than easy endurance and may crowd out truly hard work.
Zone 4 is threshold-style work. This is hard sustainable riding near the intensity you can hold for a limited duration. Threshold intervals require focus and recovery. They can improve the ability to sustain hard efforts, but they should be placed deliberately, not sprinkled into every ride because a hill or group pace pulled you there.
Zone 5 is very hard. These are short efforts used for VO2 max intervals, hard surges, race attacks, steep punchy climbs, or top-end work. Heart rate lags during these efforts, so Zone 5 heart rate time may underestimate how hard short intervals really were. A one-minute power surge may be physiologically hard even if heart rate does not reach Zone 5 until the effort is nearly over.
Why Cyclists Should Not Read Heart Rate Alone
Heart rate is an internal response. It tells you how hard the body is working to support the ride. It does not directly measure the work at the pedals.
Power is external output. It responds immediately when you press harder or softer. If you sprint, power jumps instantly. Heart rate follows later. If you coast, power drops instantly. Heart rate takes time to fall. That delay is one reason cyclists with power meters should use heart rate and power together rather than treating either metric as complete.
Heart rate also drifts. During prolonged exercise, heart rate can rise even when external output is stable. Coyle and Gonzalez-Alonso reviewed cardiovascular drift and the way heart rate can climb over time with heat stress, dehydration, and prolonged exercise (Exercise and Sport Sciences Reviews). A long endurance ride may start at the top of Zone 2 and end in Zone 3 at the same power. That can mean heat, dehydration, fatigue, under-fueling, or simply the normal cost of duration.
Hydration and heat matter. The American College of Sports Medicine position stand on exercise and fluid replacement describes how fluid deficits and heat stress can increase cardiovascular strain during exercise (Medicine & Science in Sports & Exercise). For cyclists, this means the same power can produce higher heart rate indoors, during summer, in poor airflow, or late in a long ride.
Fatigue matters too. If your usual endurance power suddenly sits 10 beats higher than normal, the answer may not be "fitness is worse." It may be poor sleep, accumulated training load, illness, stress, low carbohydrate availability, heat, or a hard session that you have not absorbed yet.
Heart Rate Versus Power Zones
Cyclists often ask whether heart rate zones or power zones are better. The practical answer is that they answer different questions.
Power tells you what you are doing. Heart rate tells you what it costs. If you have both, use both.
For pacing short intervals, power is usually better because it responds immediately. If the workout calls for 5 x 3 minutes hard, power helps you avoid starting too hard or too easy before heart rate catches up. For sprint efforts, heart rate is especially limited because the interval may end before heart rate stabilizes.
For endurance rides, heart rate can be more informative than power alone. If your normal Zone 2 power produces unusually high heart rate, that is a signal. It may mean fatigue, heat, dehydration, illness, or that you need an easier day. Power says the ride is the same. Heart rate says your body is not experiencing it the same way.
For long climbs, both matter. Power helps you avoid surging. Heart rate helps you see whether the effort is becoming too expensive. If power is steady but heart rate rises sharply, you may need to cool, fuel, drink, or back off.
For racing, heart rate is context. In a criterium, mountain bike race, cyclocross race, or group ride with repeated surges, heart rate may stay high because recovery is incomplete. It tells you the internal strain, but it cannot describe each acceleration as clearly as power. In a long gran fondo or time trial, heart rate can help you avoid burning too much too early, especially if you know how your heart rate normally behaves at race effort.
The best analysis compares the relationship between power and heart rate over time. If power at a given heart rate improves under similar conditions, fitness may be improving. If heart rate at a familiar power rises unusually, recovery or conditions may need attention. If power is stable but heart rate drifts more than usual, the ride may be exposing durability, fueling, or heat-tolerance limits.
How To Read Heart Rate Drift And Decoupling
One of the most useful cycling applications of heart rate is not the zone number itself. It is the relationship between heart rate and output over time.
Cyclists often call this drift or decoupling. The idea is simple: if you ride at a steady power, pace, or perceived effort, heart rate should be relatively stable once you are warmed up. If heart rate rises steadily while output stays similar, the body is paying more internal cost for the same external work.
Some drift is normal. A three-hour ride will not look like a 30-minute warmup. Temperature rises, glycogen changes, hydration changes, muscle fatigue accumulates, and the cardiovascular system keeps supporting cooling and working muscle. The question is whether the drift is expected for the ride or unusual for you.
For an endurance ride, compare the first stable half with the second stable half. Ignore the warmup, stops, descents, traffic lights, and obvious coasting. If power is similar but heart rate is much higher later, ask what changed. Was it hotter? Did the route include longer climbs late? Did you under-fuel? Was the ride longer than your current durability supports? Did you start too hard and pay for it later?
For a long Zone 2 ride, mild drift can be acceptable. It may even be part of the endurance stimulus. But if a ride that should be easy becomes a Zone 3 grind every weekend, the training may be too ambitious, the fueling plan may be weak, or the early pace may be too high. The solution is not always more intensity. Often it is better pacing, better cooling, better fueling, or more gradual long-ride progression.
For a threshold workout, drift tells a different story. If each interval requires a higher heart rate for the same power and perceived effort rises quickly, the session may be doing its job. If heart rate is unusually high from the first interval, you may be tired, hot, dehydrated, or still carrying fatigue from prior training. If heart rate is unusually low but RPE is high and power is poor, that can also be a warning sign. Heart rate does not always rise normally when the athlete is flat.
This is why training-load research separates external load from internal load. External load is the work you did: watts, duration, distance, climbing, and intervals. Internal load is how your body responded: heart rate, RPE, fatigue, soreness, and recovery. Bourdon and colleagues emphasize that both views are needed to understand training stress (International Journal of Sports Physiology and Performance). A ride file with normal watts and abnormal heart rate is not a contradiction. It is the point of monitoring both.
Zone Training Log can help by keeping the ride context attached to the zone chart. A note like "hot indoor trainer, weak fan" or "long gravel ride, under-fueled late" may explain a heart-rate curve that otherwise looks like lost fitness. Over months, those notes teach you which drift patterns are normal and which ones signal a need to adjust.
How To Set Cycling Zones From A Field Test
A field test can help when estimates feel too vague. The safest field-test choice depends on the cyclist's experience, health, and training history. Beginners do not need maximal tests. Experienced cyclists may use a coached protocol, lab test, ramp test, time trial, or threshold estimate.
If you are testing maximum heart rate, understand that it is physically demanding and not appropriate for everyone. A true max test requires high motivation, sufficient warmup, and an effort close to exhaustion. It should not be done when ill, sleep-deprived, unusually fatigued, or medically uncertain. If you have cardiovascular symptoms or risk concerns, get medical guidance before maximal testing.
Many cyclists are better served by a threshold-style field test. A common approach is a hard, steady effort after a thorough warmup, then using the later portion to estimate threshold heart rate. The exact protocol should be consistent. Do not compare a 20-minute climb, a ramp test, an indoor trainer session, and an outdoor windy loop as if they are the same test.
For heart-rate zones, the test must match the sport. Cycling threshold heart rate should come from cycling. If you test running threshold and apply it to cycling, you may create zones that do not reflect your bike physiology.
The most important part of field testing is repeatability:
- Use the same bike or trainer setup.
- Use the same warmup.
- Use the same route, climb, or trainer mode.
- Standardize fan, temperature, and hydration indoors.
- Avoid testing after a hard block unless fatigue is part of what you are measuring.
- Record notes about sleep, caffeine, stress, and perceived effort.
One test is a starting point. Several weeks of workouts tell you whether the zones behave well.
How To Use Zones During Different Cycling Workouts
Heart-rate zones work best when each ride has a purpose before you start. The zone target should match that purpose.
For a recovery spin, use Zone 1 as a ceiling. The point is blood flow, movement, and readiness, not fitness proof. If the route or group keeps pulling you into Zone 3, choose a flatter route, ride alone, use the trainer, or skip the ride.
For an endurance ride, aim mostly for Zone 2 with Zone 1 during descents, stops, or very easy sections. Brief Zone 3 on hills is not a failure. Sustained Zone 3 for most of the ride means you have changed the session into tempo.
For a tempo ride, Zone 3 is the target. It should feel steady and controlled. Tempo can be useful for long climbs, sportive preparation, time-trial durability, and riders who need moderate sustained work. The mistake is adding tempo so often that it steals from recovery and true quality sessions.
For threshold intervals, Zone 4 may be the broad heart-rate target, but remember that heart rate lags. The first interval may take several minutes to reach the zone. Pacing by power, perceived effort, or a known climb can help, while heart rate confirms the internal strain.
For VO2 max intervals, heart rate is often a delayed confirmation, not a primary pacing tool. A 30-second or one-minute hard effort may be driven by power and perceived effort. Heart rate may rise into Zone 5 only late or between repeats. Do not make the effort harder just because heart rate has not caught up.
For long rides, watch drift. If the same endurance power moves from mid-Zone 2 heart rate to sustained Zone 3, ask why. Duration itself may be the reason. Heat, dehydration, low fueling, fatigue, and terrain may also be involved. The response should be proportional: adjust the day, then check whether the pattern repeats.
Build A Cycling Week By Zone
A good cycling week is not just a pile of rides. It is a distribution of stress. Zones help make that distribution visible.
Many successful endurance approaches keep a large share of training at low intensity and place moderate or high-intensity work deliberately. Seiler's review of intensity distribution describes how endurance athletes often accumulate most training below the first threshold, with smaller doses of moderate and high-intensity work (International Journal of Sports Physiology and Performance). In trained cyclists, Neal and colleagues found that six weeks of polarized intensity distribution produced greater physiological and performance adaptations than a threshold-heavy model in their study (International Journal of Sports Physiology and Performance).
That does not mean every cyclist needs a strict polarized plan. It means the week should have contrast. Easy days should be easy enough to recover. Hard days should be hard enough to create the intended stimulus. Tempo and threshold work should appear because the plan calls for them, not because every group ride turns moderate.
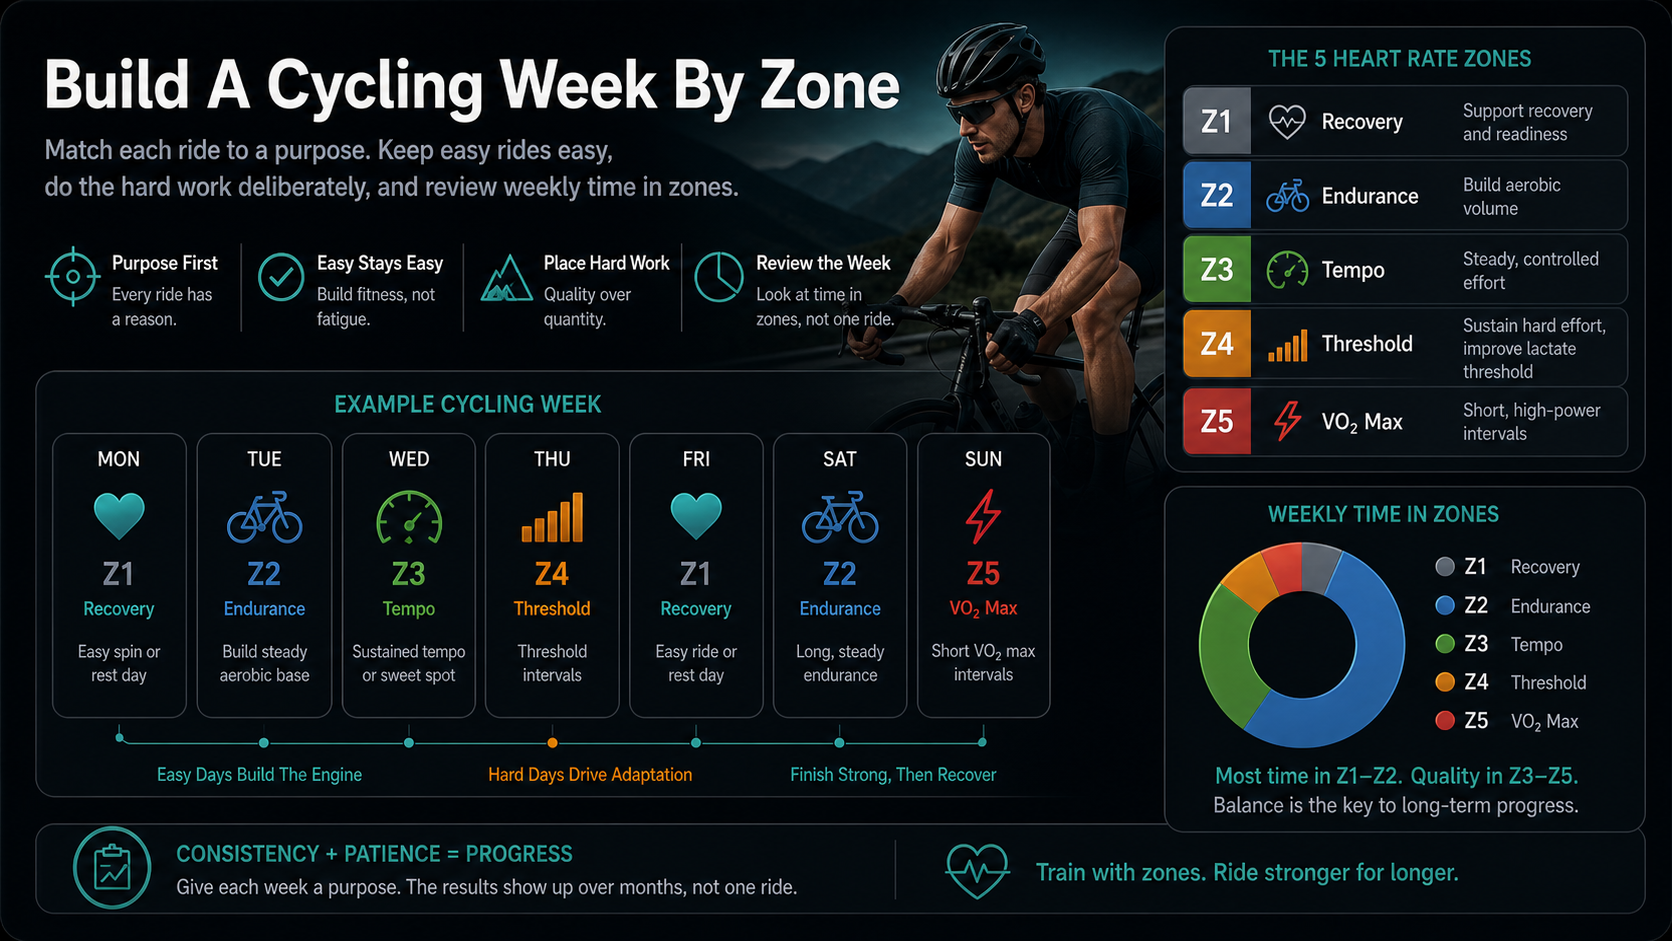
A simple endurance-focused week might include two or three Zone 2 rides, one quality session, one longer endurance ride, and one or two rest or recovery days. A time-crunched cyclist might use fewer total hours but still protect contrast: one interval session, one endurance ride, one tempo or sweet-spot ride, and one recovery spin or rest day. A race-specific block may include more Zone 3 and Zone 4, but that should be a temporary choice with recovery planned around it.
Here is a practical way to review a week:
| Weekly question | What to look for |
|---|---|
| Did easy rides stay easy? | Mostly Zone 1-2, with limited accidental Zone 3 |
| Was hard work deliberate? | Zone 4-5 came from planned workouts, not random surges |
| Did Zone 3 have a reason? | Tempo, climbs, race-specific work, or group-ride goal |
| Did heart rate drift unusually? | Late Zone 3 at normal power may signal heat, fueling, or fatigue |
| Did the next ride suffer? | Poor recovery suggests too much intensity or not enough rest |
The goal is not a perfect chart. The goal is a week that matches your training purpose.
How Zones Change Across The Training Year
Cyclists should not use zones the same way in every phase. The zone definitions may stay mostly stable, but the distribution of time in those zones should change with the goal.
In a base phase, zones help protect easy volume. A base block is not just slow riding for its own sake. It is a chance to build aerobic capacity, durability, fatigue resistance, and repeatable training habits without spending too much recovery budget. Zone 2 does much of the work here. Zone 1 supports recovery. Zone 3 may appear in small controlled doses, but it should not quietly replace endurance volume.
In a build phase, zones help place stress. Threshold intervals, VO2 max work, tempo blocks, and race-specific climbs may all become more important. The key is intent. More time in Zone 4 or Zone 5 can be productive when it comes from planned workouts. More time in Zone 3 because every easy ride turned into a fast group ride is different. Stoggl and Sperlich compared different endurance-training intensity models and found that polarized training produced broad improvements over a nine-week intervention in trained endurance athletes (Frontiers in Physiology). That does not mean a cyclist must follow a pure polarized model, but it reinforces the principle that intensity distribution is a training variable.
In a race-specific phase, zones need to match the event. A time trialist may need more sustained work around threshold. A gran fondo rider may need long Zone 2 rides with tempo climbs. A criterium racer may need repeated high-intensity surges and incomplete recovery. A mountain biker may need repeated spikes, technical fatigue, and high heart rate despite variable power. The right zone mix depends on the demands of the event.
In a recovery week, zones help you avoid lying to yourself. Many cyclists call rides easy while still drifting through Zone 3 because the legs feel good after a few lighter days. A recovery week should reduce stress. That usually means more Zone 1, shorter Zone 2 rides, fewer hard efforts, and no accidental race simulation.
In the off-season, zones can keep training honest without making it obsessive. Some cyclists benefit from unstructured riding, strength work, skills, and low-pressure endurance. Heart rate can still prevent easy rides from becoming too hard, but the goal may be freshness and consistency rather than perfect distribution.
The important point is that zone training is not a fixed template. It is a language for matching training stress to the season.
Zone Training For Indoor Cycling
Indoor cycling changes heart rate. Heat buildup is usually higher indoors because airflow is lower. Even with a fan, cooling is rarely identical to outdoor riding. Heart rate may rise faster, drift more, and feel harder at the same power.
This does not make indoor heart-rate zones useless. It means you need context. If your Zone 2 power always becomes high Zone 3 indoors without enough cooling, the problem may be the room, not your fitness. Use a strong fan, hydrate, keep the room cool when possible, and compare indoor rides with indoor rides rather than outdoor rides.
Smart trainers also change the pacing problem. Erg mode can lock power, but heart rate will still tell you how the body is responding. If a standard endurance workout produces a much higher heart rate than normal, treat that as information. You may need more recovery, better cooling, or lower intensity that day.
For short indoor intervals, power and perceived effort are usually better primary guides. Heart rate confirms the internal load after it catches up.
Zone Training For Road, Gravel, And Mountain Biking
Road cycling can be steady or highly variable. Solo endurance rides are often easy to control by heart rate. Group rides, hilly routes, and races are harder because surges, drafting, climbs, and traffic change effort constantly. In group rides, heart rate often tells you after the fact that the ride was harder than it felt socially.
Gravel riding adds surface cost. Rough roads, wind exposure, tire pressure, technical handling, and rolling terrain can raise heart rate at a speed that looks slow compared with road cycling. Do not judge gravel by road speed. Use heart rate, effort, power if available, and notes about terrain.
Mountain biking is even more stochastic. Short climbs, technical features, braking, cornering, descending, and upper-body tension all affect heart rate. Zone targets can still help, but they are harder to hold precisely. For mountain biking, weekly zone distribution and perceived effort may be more useful than trying to keep every minute inside a narrow zone.
In all three disciplines, the same principle applies: zones need context. A Zone 4 block on a planned climb repeat is different from a Zone 4 block caused by chasing a group on a recovery day.
How To Use Heart Rate Zones For Fueling And Heat
Heart rate can reveal when a ride is costing more than expected. Fueling and heat are two common causes.
On longer rides, heart rate may climb because carbohydrate availability is falling, dehydration is increasing, or heat strain is building. If power is steady but heart rate rises and perceived effort climbs, do not assume you suddenly lost fitness mid-ride. Ask whether you are drinking enough, taking in enough carbohydrate for the duration, cooling effectively, and pacing the early part conservatively.
For endurance rides, fueling is partly about preserving the training goal. If the purpose is aerobic volume, under-fueling can turn a controlled ride into a survival session. That may increase stress without improving the intended adaptation. On the other hand, short easy rides do not need to be overcomplicated. Match fueling to duration, intensity, climate, and your overall nutrition.
Heat requires humility. A normal Zone 2 pace or power may produce Zone 3 heart rate in hot conditions. You can slow down, lower power, ride earlier, add cooling, or accept that the day is harder. What you should not do is pretend the internal load is unchanged.
Using RPE With Cycling Zones
Rate of perceived exertion, or RPE, is the simplest backup metric and one of the most useful. Heart rate can be noisy. Power meters can be unavailable or miscalibrated. Speed depends on terrain and wind. RPE travels with you.
Foster and colleagues described session RPE as a practical way to monitor training load across exercise sessions (Journal of Strength and Conditioning Research). For cyclists, pairing RPE with heart rate makes zone training more robust.
Zone 1 should feel very easy. Zone 2 should feel comfortable and sustainable. Zone 3 should feel steady and purposeful. Zone 4 should feel hard and focused. Zone 5 should feel very hard and short-lived. If your device says Zone 2 but your breathing, legs, and focus say threshold, trust the body signal and investigate the mismatch.
RPE is also useful when heart rate is suppressed. Some riders see lower-than-expected heart rate during fatigue, heat stress, heavy training, or poor recovery. Others see high heart rate from caffeine, stress, or dehydration. The number matters, but the number is not the only evidence.
How To Review Cycling Zones After A Ride
Do not judge a ride only by average heart rate. Average values hide intervals, climbs, descents, coasting, stops, and drift. A ride with 45 minutes in Zone 2 and 15 minutes of short Zone 5 surges can have the same average heart rate as a steady tempo ride. The training meaning is different.
Start with the ride purpose. Was it recovery, endurance, tempo, threshold, VO2 max, race simulation, commute, group ride, or fun? Then compare the zone distribution with that purpose.
For an endurance ride, ask:
- How much time stayed in Zone 1-2?
- Did Zone 3 appear only on hills or for long blocks?
- Did heart rate drift upward at the same power?
- Did effort stay comfortable?
- Did the next day's ride feel normal?
For a hard workout, ask:
- Did heart rate reach the expected range after the lag?
- Did intervals become harder internally at the same power?
- Did recovery heart rate behave normally between efforts?
- Did the hard-zone time come from the planned set?
For a group ride, ask:
- Was the ride actually easy, or just socially easy?
- Did surges create more Zone 4-5 than expected?
- Did drafting hide power while heart rate stayed high?
- Should the ride count as quality work in the weekly plan?
The point is not to grade every ride harshly. It is to learn whether the training stress matched the plan.
How Zone Training Log Helps Cyclists
Zone Training Log is useful because cycling data needs context. A power file can show external work. Heart rate zones show internal response. Notes, tags, ride titles, and weekly summaries explain why the numbers looked the way they did.
Use tags for ride types: recovery, endurance, tempo, threshold, VO2 max, long ride, commute, gravel, mountain bike, indoor trainer, race, and group ride. Then review time in zones by ride type. This helps answer practical questions:
- Are endurance rides staying mostly easy?
- Are group rides replacing planned hard workouts?
- Is Zone 3 growing because of deliberate tempo work or accidental intensity creep?
- Are indoor rides showing more drift than outdoor rides?
- Are long rides producing less late drift over time?
The weekly view matters more than a single ride. One hot ride can mislead you. A month of rising Zone 3 on easy days is a pattern. One race can produce unusual heart-rate distribution. A block of workouts that always misses the intended zone may mean the zones need adjustment or the plan needs more recovery.
For cyclists using Apple Health, Health Connect, or imported training data, the benefit is not just storage. It is interpretation. Zone summaries turn raw heart-rate traces into a training log you can actually review.
Common Mistakes Cyclists Make With Heart Rate Zones
The first mistake is using running zones for cycling without checking them. Running and cycling heart-rate responses can differ. Use cycling-specific tests and ride data when possible.
The second mistake is treating age-based zones as personal truth. Age formulas are rough estimates. They are useful only until better data is available.
The third mistake is chasing heart rate during short intervals. Heart rate lags, so trying to force Zone 5 immediately can make the interval too hard.
The fourth mistake is ignoring heat and airflow indoors. A poorly cooled trainer session can make normal endurance power look like tempo by heart rate.
The fifth mistake is turning every ride into Zone 3. Tempo has a place, but constant moderate work can crowd out recovery and true quality.
The sixth mistake is comparing rides without context. Outdoor road, gravel, mountain bike, indoor trainer, group ride, and solo endurance ride all create different heart-rate patterns.
The seventh mistake is changing zones after every weird ride. If a sensor glitches, a room is hot, or you slept poorly, the chart may be strange. Look for repeated patterns before editing zones.
The eighth mistake is ignoring symptoms. Heart-rate zones are training tools, not medical diagnostics. Chest pain, fainting, unusual shortness of breath, a new irregular heartbeat, or unexplained severe fatigue deserves medical attention, not a zone-chart explanation.
A Practical Setup Checklist
Start with the best cycling-specific heart-rate anchor you have. If you know cycling HRmax and resting heart rate, use heart-rate reserve. If you only know cycling HRmax, use max-heart-rate zones. If you know neither, use age-based zones as a temporary estimate.
Calculate zones and save them somewhere consistent. If you use Zone Training Log, compare the calculated ranges with your app settings and workout summaries.
Do two or three normal endurance rides and sanity-check the numbers. Zone 2 should feel easy and sustainable. Zone 3 should feel steady and more deliberate. Zone 4 should feel hard. If the zones do not match obvious effort signals, investigate before building a plan around them.
Add context notes for the first few weeks. Record indoor versus outdoor, heat, route, bike type, group ride, sleep, caffeine, and whether the effort felt normal. Those notes will explain many "bad" heart-rate days.
Review weekly time in zones. Do not obsess over one ride. Ask whether the week matched the plan.
Retest or revise only when you have better evidence. Good reasons include a cycling field test, a lab result, a coach assessment, several weeks of consistent mismatch, or a major fitness change. Bad reasons include one hot ride, one sensor spike, or one group ride that became harder than planned.
Sample Cycling Zone Plans
A beginner endurance plan should keep most riding easy. The goal is consistency, bike handling, tissue tolerance, and aerobic development. Two or three Zone 2 rides, one optional short skills or cadence session, and enough rest can be more productive than constant hard riding.
An intermediate endurance plan might include one threshold or tempo session, one long Zone 2 ride, one or two shorter Zone 2 rides, and one recovery spin. Zone 3 appears intentionally, not by accident.
A time-crunched plan may include more intensity because total hours are limited. That can work, but recovery still matters. A cyclist riding four hours per week cannot turn every ride into a race and expect steady progress. Even time-crunched riders need easier sessions and rest.
A sportive or gran fondo plan often benefits from long Zone 2 rides, tempo blocks, climbing practice, and fueling work. Heart rate helps keep the long rides controlled and shows whether tempo blocks are becoming too expensive.
A criterium or short-race plan needs more high-intensity work, but heart rate is not always the best pacing metric for short surges. Use power, perceived effort, and workout structure for the intervals, then review heart-rate load afterward.
A mountain bike plan should include technical specificity. Heart-rate zones still matter, but technical terrain creates spikes and coasting. Review the whole ride and weekly distribution rather than expecting smooth zone control.
When To Adjust Your Zones
Adjust zones when the evidence is strong enough. That usually means a new test, a clear mismatch repeated across similar rides, or a block of training that changed fitness substantially.
Signs your zones may be too low:
- Easy endurance rides always appear as Zone 3 or Zone 4.
- You can talk comfortably while the chart says threshold.
- Recovery rides show moderate zones despite very low effort.
- Your cycling HRmax estimate came from an age formula and seems obviously low.
Signs your zones may be too high:
- Zone 2 feels too hard to sustain.
- Tempo targets feel like threshold.
- You rarely reach higher zones even in very hard cycling efforts.
- Your HRmax estimate came from running and is much higher than cycling responses.
Before changing zones, check sensor quality, heat, fatigue, and route context. A loose optical sensor, poor indoor cooling, or a hard training block can mimic bad zones.
Conclusion
Heart rate zone training helps cyclists connect ride purpose with internal load. It tells you whether an endurance ride stayed easy, whether tempo work was deliberate, whether threshold intervals created the intended strain, and whether a long ride became more expensive than planned.
The best use of heart rate is not blind obedience. It is interpretation. Calculate a reasonable starting point, preferably with cycling-specific data. Use the heart-rate zone calculator to create ranges, then compare them with real rides. Pair heart rate with power when available. Add RPE and notes. Review weekly time in zones instead of judging one ride in isolation.
Zone 1 helps you recover. Zone 2 builds the aerobic engine. Zone 3 creates steady tempo when planned. Zone 4 builds hard sustainable effort. Zone 5 supports short high-intensity work. The art is putting those zones in the right places.
If you also run, use Zone 2 Running vs Cycling to keep the two sports' heart-rate targets and recovery costs in context.
For cyclists, the goal is not a perfect chart. The goal is a better training week: easy rides that stay easy, hard rides that are intentional, and enough context to understand what your body is telling you.

Our editorial approach & AI disclosure
We use AI to help research, organize, and draft some articles. Every article is reviewed by a human editor and aims to reflect current evidence-based training practices and scientific literature.
Read our editorial policy