
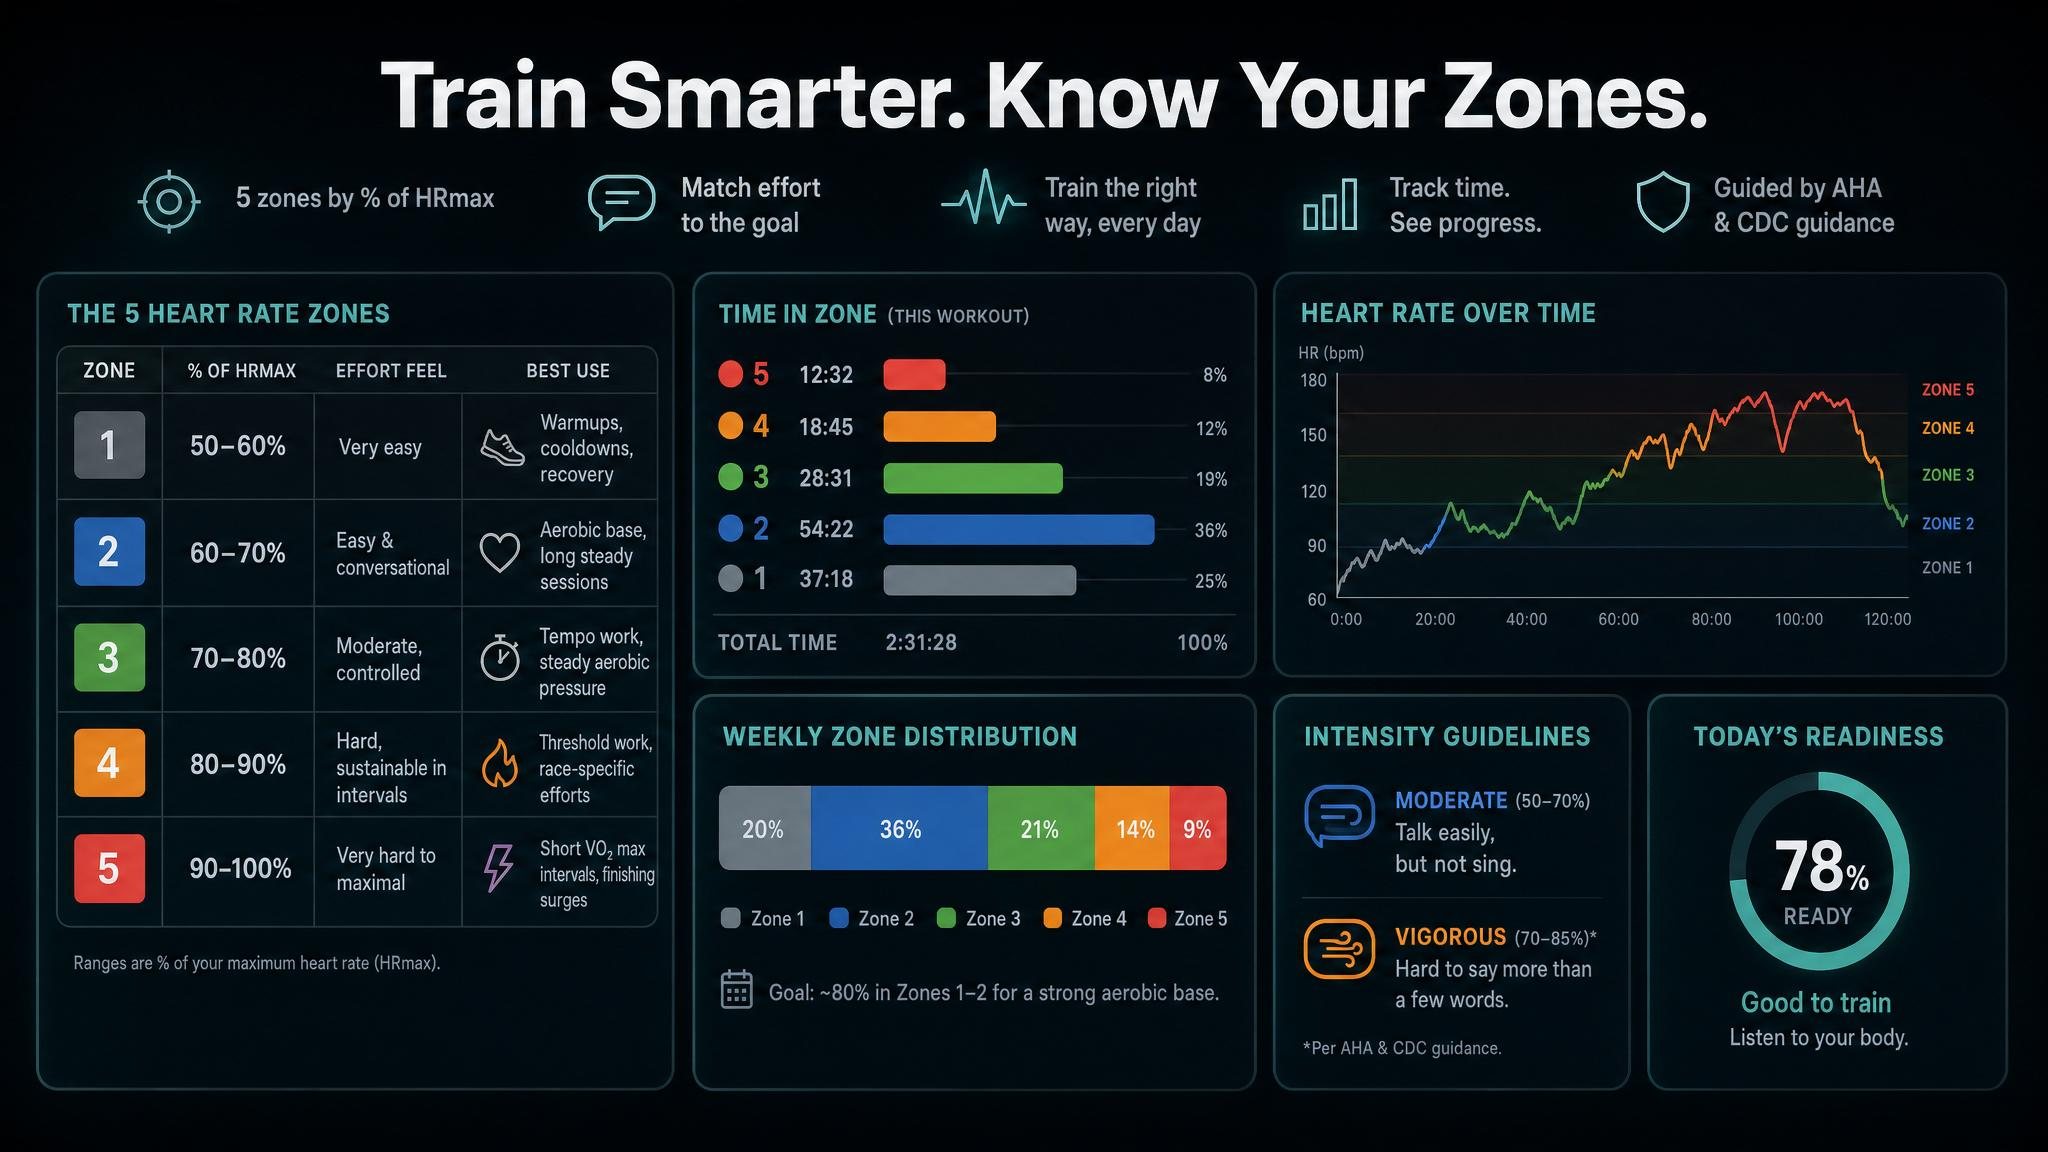
The five heart rate zones split cardio intensity from easy recovery to near-max intervals. Learn the percentages, how each zone feels, and how to calculate your own ranges.

The 5 heart rate zones are a simple way to divide cardio intensity from very easy movement to near-maximal effort. In the common percent-of-max-heart-rate model, Zone 1 is about 50-60% of maximum heart rate, Zone 2 is 60-70%, Zone 3 is 70-80%, Zone 4 is 80-90%, and Zone 5 is 90-100%. Polar describes this as dividing the range from 50% to 100% of maximum heart rate into five zones, while Apple describes workout heart rate zones as five segments from easier to harder effort levels based on maximum heart rate and health data (Polar, Apple).
Those percentages are useful, but they are not magic. Heart rate is a delayed signal. It changes with heat, fatigue, caffeine, sleep, hydration, stress, terrain, and medication. The zones are best treated as a practical training map: easy work should feel easy, hard work should be used deliberately, and the exact beats per minute should be adjusted when better testing data is available.
Most consumer watches and training apps label the five zones differently, but the basic pattern is consistent: each zone represents a higher percentage of your maximum heart rate and a higher perceived effort.
| Zone | Common range | Effort feel | Best use |
|---|---|---|---|
| Zone 1 | 50-60% HRmax | Very easy | Warmups, cooldowns, recovery days |
| Zone 2 | 60-70% HRmax | Easy and conversational | Aerobic base, long steady sessions |
| Zone 3 | 70-80% HRmax | Moderate, controlled | Tempo work, steady aerobic pressure |
| Zone 4 | 80-90% HRmax | Hard, sustainable in intervals | Threshold work, race-specific efforts |
| Zone 5 | 90-100% HRmax | Very hard to maximal | Short VO2 max intervals, finishing surges |
Public-health guidance uses broader intensity bands than a five-zone training model. The American Heart Association lists moderate-intensity activity at about 50-70% of maximum heart rate and vigorous activity at about 70-85% of maximum heart rate, while noting that the numbers are averages and should be used as a general guide (American Heart Association). The CDC also recommends using subjective cues: moderate effort usually allows talking but not singing, while vigorous effort makes it hard to say more than a few words without pausing for breath (CDC).
Zone 1 is the easiest training zone, usually around 50-60% of maximum heart rate. It should feel relaxed enough that you could hold a normal conversation. For endurance athletes, Zone 1 is useful for warmups, cooldowns, recovery rides, easy walks, and low-stress movement on days when the goal is circulation rather than fitness gain.
Do not dismiss Zone 1 just because it feels easy. It helps you start sessions gradually and keeps true recovery days from turning into moderate workouts. If you are returning from a break, managing fatigue, or building consistency, Zone 1 can be where a lot of useful training begins.
Zone 2 is usually around 60-70% of maximum heart rate. It should feel controlled, repeatable, and conversational. This is the zone most associated with aerobic base training because it lets you accumulate time without the recovery cost of harder work.
The main mistake is forcing Zone 2 to be a single perfect number. On hills, in heat, or late in a long workout, heart rate may drift upward even if your pace or power stays steady. Use the range as a ceiling, then cross-check it with breathing. If you cannot speak in short sentences, the effort has probably moved above easy aerobic work, even if the watch still shows Zone 2.
Zone 3 is usually around 70-80% of maximum heart rate. It often feels like steady tempo: harder than easy endurance work, but not an all-out effort. You can use it for controlled steady-state sessions, progression runs, longer climbs, and workouts where you want aerobic pressure without pushing all the way to threshold.
Zone 3 is productive, but it is also easy to overuse. Many athletes accidentally turn easy days into Zone 3 days because it feels satisfyingly fast while still manageable. That can make hard sessions worse and recovery slower. If a plan calls for easy endurance, spending the whole workout in Zone 3 usually means the workout drifted away from its purpose.
Zone 4 is usually around 80-90% of maximum heart rate. It is hard, focused work near the intensity many athletes associate with threshold intervals or strong race-specific efforts. It should feel sustainable for limited blocks, not comfortable.
Use Zone 4 carefully. It can be valuable for improving your ability to hold hard aerobic efforts, but it carries a higher recovery cost than Zones 1 and 2. For most recreational athletes, Zone 4 belongs in planned workouts rather than every time a route or group ride gets competitive.
Zone 5 is usually around 90-100% of maximum heart rate. It is the top end: short intervals, hard surges, finishing kicks, and efforts where speaking is not realistic. Heart rate also lags behind sudden changes in effort, so very short sprints may not show much Zone 5 time even when the muscular effort is maximal.
That lag matters. If you do 20-second hill sprints, power and pace may spike immediately, but heart rate may peak after the work interval is almost over. Zone 5 is therefore more useful for longer high-intensity intervals than for judging every short burst.
There are three common ways to set zones: percent of maximum heart rate, heart-rate reserve, and tested thresholds.
The simplest method is percent of maximum heart rate. If your maximum heart rate is 180 bpm, Zone 2 at 60-70% HRmax is roughly 108-126 bpm. This method is easy to understand, but it depends heavily on having a realistic maximum heart rate.
Age-based estimates are only a starting point. The American Heart Association still presents the familiar 220-minus-age estimate for public guidance, while Tanaka, Monahan, and Seals proposed 208 - 0.7 x age after analyzing measured maximum heart rate data from 351 studies and validating it in a lab sample of healthy adults (AHA, JACC). Both are population formulas, not personal tests.
Heart-rate reserve uses both maximum heart rate and resting heart rate. The formula is:
target heart rate = ((HRmax - HRrest) x intensity) + HRrest
This approach is commonly called the Karvonen method, after Karvonen, Kentala, and Mustala's 1957 longitudinal study on training and heart rate (PubMed). It often gives higher training-zone BPMs than a simple percent-of-max method for athletes with low resting heart rates, because it accounts for the usable range between rest and max.
Use the calculator below to compare methods. The standalone version is also available at the Heart Rate Zone Calculator.
Related
Use heart-rate reserve if you know both a realistic maximum heart rate and a reliable resting heart rate. It is a good everyday method for athletes who track resting heart rate consistently.
Use percent of maximum heart rate if you only know your maximum heart rate. This is the easiest model to explain, and it matches the common five-zone split shown in many consumer training tools.
Use an age-based estimate only when you do not have better data yet. It is fine for a first pass, but do not be surprised if the zones feel too easy or too hard. If your watch says a steady conversational run is Zone 4, your maximum heart rate or zone settings may be wrong.
Use manual or threshold-based zones when you have tested data. TrainingPeaks recommends entering tested threshold values and setting sport-specific zones for more accurate workout analysis, especially when heart rate differs between running, cycling, swimming, and other activities (TrainingPeaks).
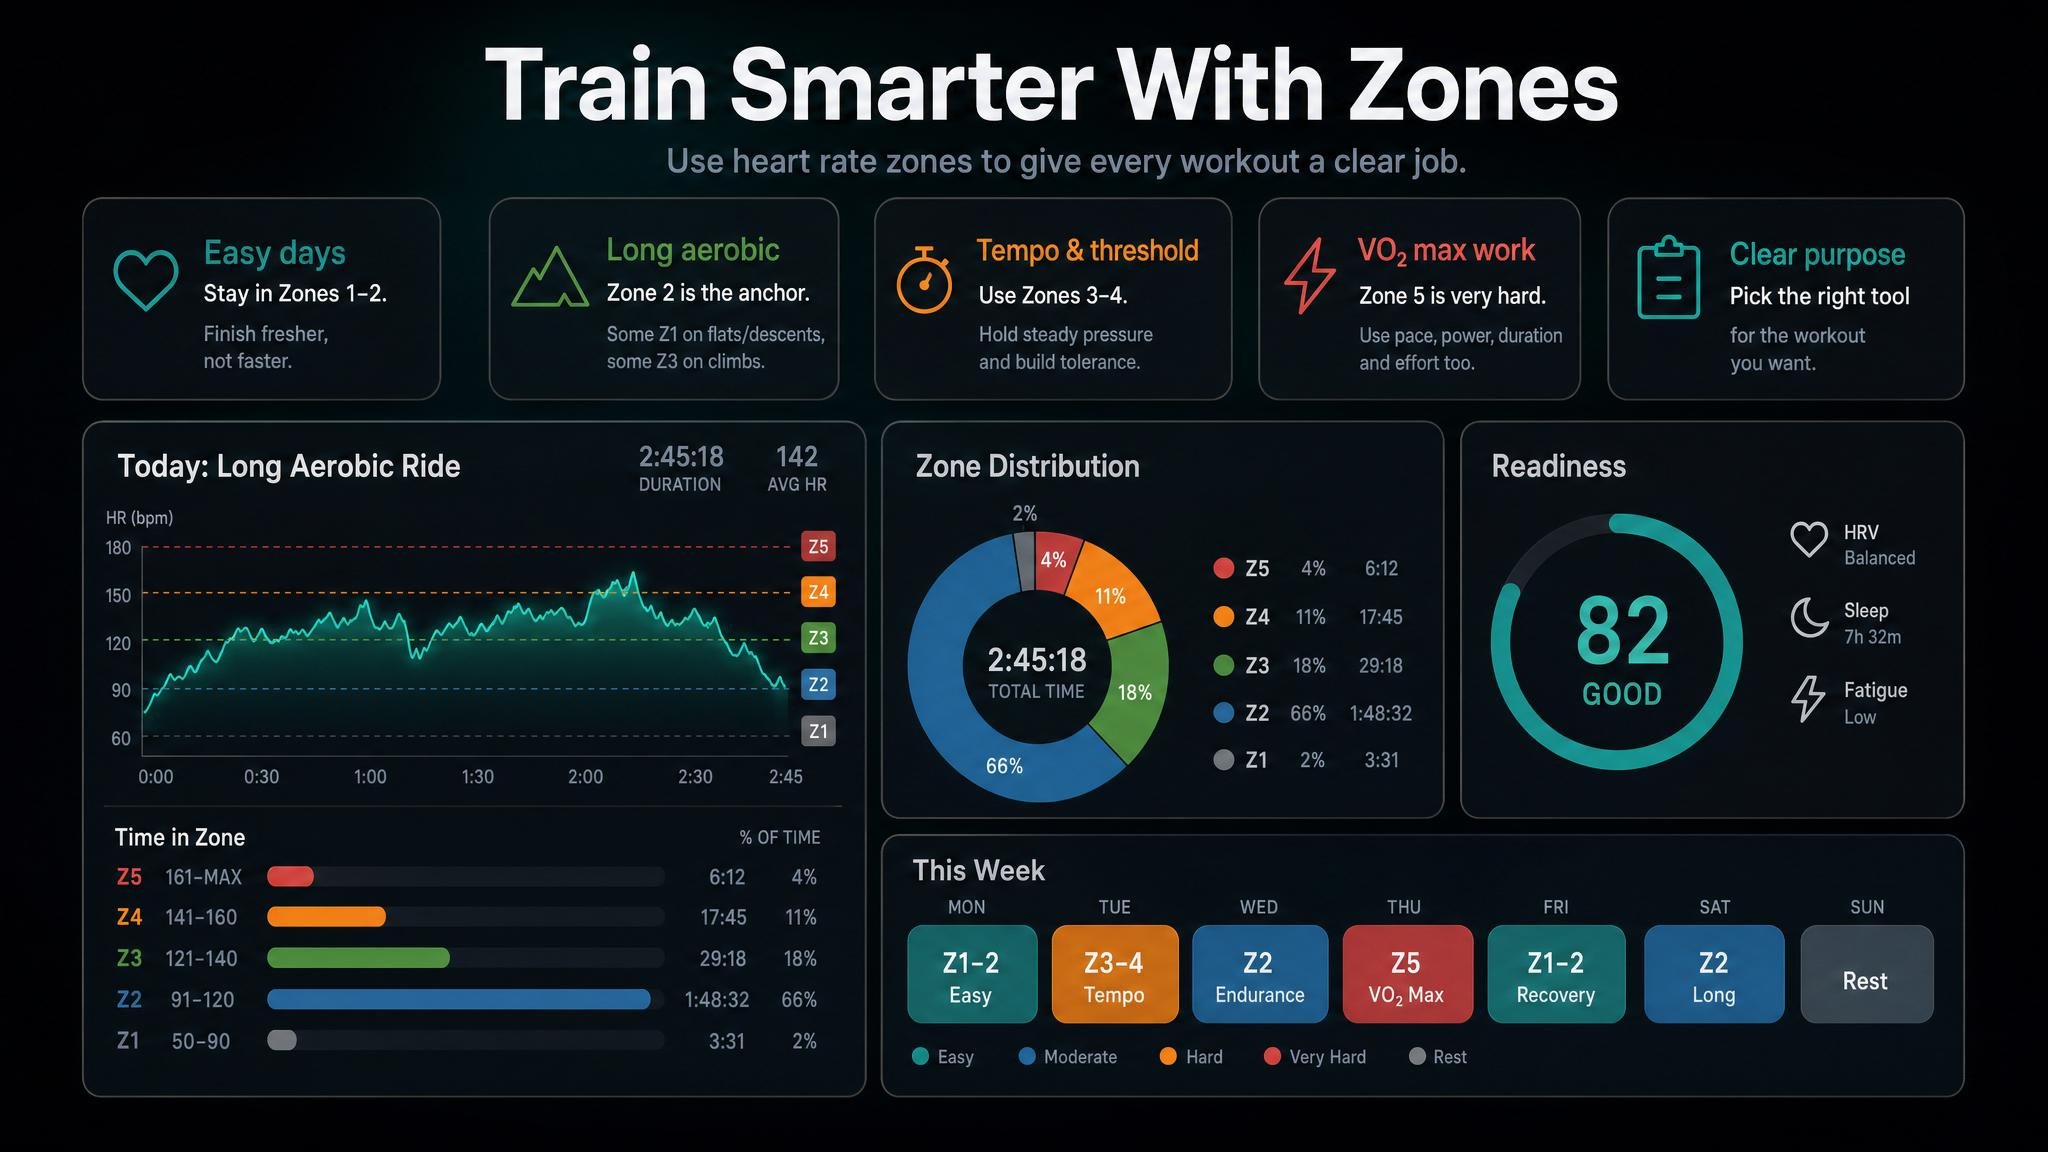
Heart rate zones work best when they clarify the job of the workout.
For easy days, stay mostly in Zones 1 and 2. The goal is to finish fresher than you started, not to prove fitness. If your easy day becomes a Zone 3 workout, reduce pace, choose flatter terrain, or shorten the session.
For long aerobic sessions, Zone 2 is usually the anchor. Some Zone 1 time during warmup and downhill sections is normal. A little Zone 3 time on climbs is also normal if the overall session stays controlled.
For tempo and threshold workouts, Zones 3 and 4 are the useful middle-to-hard range. These sessions should have a clear purpose, such as holding steady pressure, practicing race rhythm, or building tolerance for sustained hard work.
For VO2 max work, Zone 5 is a marker of very hard intensity, but it is not always the best control signal. Use pace, power, interval duration, and perceived effort alongside heart rate because heart rate responds slowly when intensity changes fast.
The first mistake is treating a formula as a lab test. Age formulas are useful for groups, but individuals can sit well above or below the estimate. If your real maximum heart rate is 15 bpm higher than your formula estimate, every zone built from that estimate will be too low.
The second mistake is ignoring medications and medical context. The AHA notes that some medications can lower maximum heart rate and target zones, and people with a heart condition or medication that affects heart rate should ask a health care professional what range is appropriate for them (American Heart Association).
The third mistake is copying someone else's zones. Two runners of the same age can have different maximum heart rates, resting heart rates, thresholds, and sport-specific responses. Your zones should describe your physiology, not your training partner's.
The fourth mistake is chasing the watch every few seconds. Heart rate is noisy and delayed. Watch the trend, not every single beat. If the session feels wrong, trust the combination of heart rate, breathing, pace, power, and fatigue.
The 5 heart rate zones are a practical intensity ladder: Zone 1 is recovery, Zone 2 is easy aerobic work, Zone 3 is moderate tempo, Zone 4 is hard threshold-style work, and Zone 5 is near-maximal intensity. The common starting point is 50-60%, 60-70%, 70-80%, 80-90%, and 90-100% of maximum heart rate.
Use the zones to make workouts more intentional, not more complicated. Start with a reasonable calculation, compare it with how the effort feels, update it when you get better data, and keep the easy days easy enough that the hard days can actually be hard.


